I’ve always envied true artists- you know, the type who can just think up something completely original out of their brain and create an incredible work of art or piece of music. While I have dabbled in music, painting, writing, dancing, and other little creative hobbies (I may have gone through a wild decopaging phase), I’ve often feel like I’m on the outside of the cool artists club.
You see, even though I can get really good at an artistic technique, I have a fear I might be like Emmet from the Lego Movie…I lack original thoughts and I like to follow the instructions. The impulsive creativity I associate with natural artists just doesn’t seem to flow through my veins. For instance, in my painting class in college, our teacher asked us to do a project by simply “painting from within.” I was frozen with panic looking at that blank canvas. No still life to copy, no artist’s style to try and emulate. Just whatever was in my floating around in my head- it was terrifying. I believe my final product on that day would be hard to decipher from some of my 4-year-old’s portraits currently taped up on our fridge.
So when people ask me where I come up with my cake designs, I have to be honest: they don’t just usually pop into my head. I do my fair share of Pinterest planning sessions and scour Youtube for gumpaste tutorials to help me along with a theme or technique. However, it is a creative process because I rarely pick a cake that I’ve seen and just make an exact replica. I usually mishmash a bunch of things I like together and come up with something fairly original.
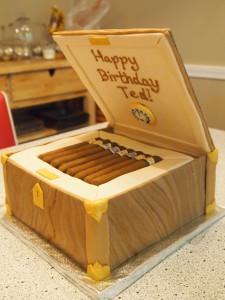
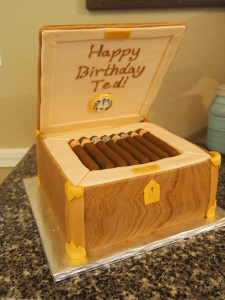
Case in point: The Cigar Box Cake.
I wanted to make an amazing cake for one of our dearest friends, Ted. He usually doesn’t ask for much at his birthday, so when he said he wanted one of my cakes, I was all over it. His love for cigars combined with the imminent birth of his second child gave me the perfect opportunity to attempt to create an entirely edible cigar box.
I thought this would be a simple cake to find a tutorial for. Surely there had to be scores of people who had paved the way to Cigar Box Cakeland before me. And yet, after several lengthy search sessions, the Google machine was failing me. All I had to go on was some pictures of completed cakes, which were helpful to inspire my design, but there was no “how-to” guide.
At first I started to panic- I was back at the terrifying blank canvas. But then after a few sketches and a kick in the pants by Micah (who always thinks I can do anything), I was like: no girl…you got this.
During those times when there are no instructions to follow, I get to experience the rush that true artists must be hooked on: the experience of translating an abstract idea into a concrete expression from my simple little brain.
That being said, I wouldn’t have turned down a little more guidance in how to make this particular type of cake. So, for anyone out there who likes instructions (like I do), I thought it was about time someone laid out how to make one of these suckers.
Cigar Box Cake Tutorial: The Wing-it Method
Though it might look initially simple, there are a lot of parts to this cake: wooden panels, a gravity-defying lid, cigars with labels, etc. It was going to involve some geometry, some guesswork, and a little prayer to pull off. Since Youtube had failed me, I was just going to have to wing-it and hope that I didn’t end up with a full-on cake wreck.
As usual, I started the project by baking the cake and making fondant. I HATE making brown fondant, however. It’s terrible stuff because the amount of gel color you need to get a dark brown usually starts breaking down the integrity of the fondant. As my fondant became stickier, I threw in some Hershey’s Special Dark Chocolate cocoa powder, and voila: I had chocolate fondant in the perfect shade of brown.
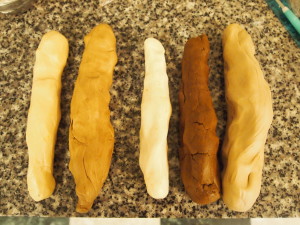
I set aside the darkest shade for my cigars, and then made a variety of colors to use later for my wood-grain panels:
Next, cigars. I decided it would be easier to build the dimensions of the cake based around the size of the completed cigars. I saw plenty of images online of sloppy fondant cigars which might be easily confused with something you find in your *ahem* toilet. It was quickly decided: No poop cigars for me!
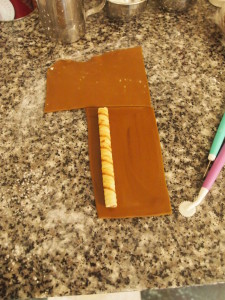
I decided the Pirouette Chocolate Hazelnut rolled wafers would give the cigars the structure they needed and make them a tasty treat. Who wants to eat a huge roll of fondant anyway?
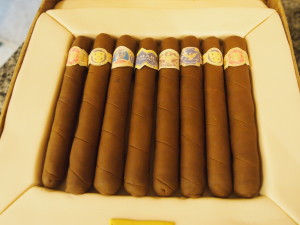
I simply wrapped the cookies up in a thin layer of my chocolate fondant and used a small knife to score lines to resemble a cigar. Here’s the final product:
The labels were a surprising pain. I must have spent hours trying to find Google images and re-size them to fit. I wasn’t worried about having edible labels…I mean, who really eats edible paper anyway? I just printed them on regular paper and attached them to the cigars with a little bit of melted chocolate candy melts (my new favorite way to attach details to fondant- way stronger than water or piping gel, and I don’t have to make royal icing).
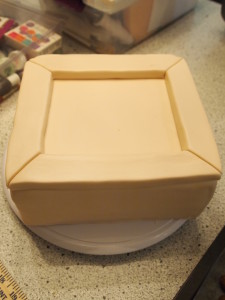
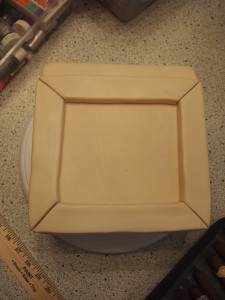
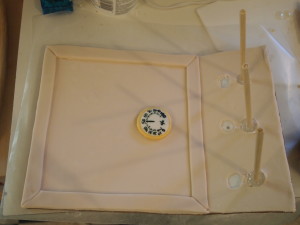
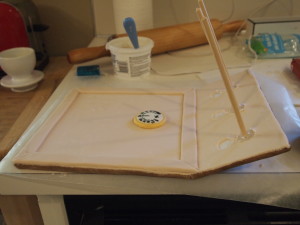
I wasn’t quite sure what method would work best, but I knew the box should have a raised border to make it appear like the cigars were, indeed, lying inside a box. I didn’t think carving the cake would stay very neat (and would be a trick to cover in fondant), so I covered the rectangle base in one layer of fondant and made the raised edges separately out of a gumpaste/fondant blend. This gave it the sharpness I wanted.
I’m not really sure how it happened, but my measurements got screwy and my borders ended up being almost 2 inches shorter than I thought I needed (see the top edge on this photo). But I was tired and crabby at this point, so I decided to just go with it. As luck would have it, I would actually recommend leaving this gap because it gives you more room to have your lid at an angle.
Now that I had my base ready to go, I could finally start on the wood panels.
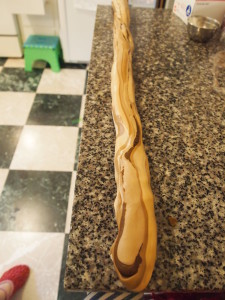
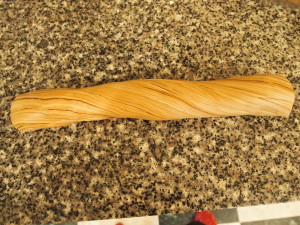
There are several ways you can make fondant look like wood and thankfully, this was one technique I was able to find some help with (and you can find a fantastic tutorial for it right here). I thought twisting the multi-colored fondant together was more realistic than painting it with food coloring and I was really happy with the result.
I don’t picture it here, but I carefully measured the dimensions of the cake base and cut out the marbled fondant to the appropriate size for each side of the box. I then set them aside for 24 hours to dry on a parchment-lined cookie sheet. I wanted sharp corners for the sides of my box and I thought having separate panels would help gain this effect.
The most nerve-wracking part of this project was figuring out how to make a lid that was structurally sound and yet realistic. I was, again, a little hit-and-miss on this technique but I was able to figure out a method that turned out very solid. First, I knew I was going to have to use foam board- sometimes it just isn’t necessary or practical to have everything 100% edible. I cut two pieces of foam board and hot glued them together at a slight angle. I then covered it with a thin layer of cream fondant and attached the wood-grain panels to the back with piping gel, trying to keep the bulk down to keep it from getting too heavy.
I needed supports to keep the whole lid from tipping over, so horizontal dowels hot-glued onto the bottom part of the lid did the trick. I did make a slight mistake in the placement of the dowels, so I did have tear them off and reattach them in a lower spot (they should be inserted directly in the middle of the cake). It’s what happens when I get lazy and just try to eye-ball it, rather than pull out a ruler. I was really nervous about the hot glue not cutting it and that the dowels would rip off the foam core once the whole thing was assembled, but thankfully, everyone behaved nicely. In fact, I was pretty surprised how structurally sound it turned out to be- this thing was a solid beast and didn’t crack shift at all in transport.
Once I inserted the lid into the base of the cake and attached the rest of the sides of the box, it looked like I was going to be able to pull this crazy idea off. Now it was time to bang out the little details to bring the whole project together.
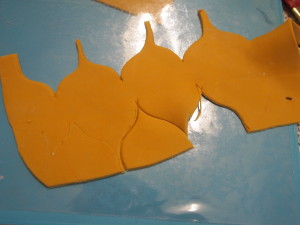
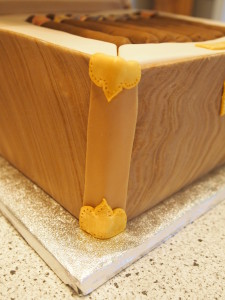
I cut out fondant designs to use as brass accents on the corners of the box. It also served to cover up any little gaps and imperfections that were left over from my not-so-perfect measurements of the wood panels.
After adding a keyhole and the birthday greeting, I was able to step back and say, this time with authority: Yes, girl, you definitely got this.
So there you have it: a tasty cigar box treat. By the way, this cake was crazy delicious: vanilla cake nestled between layers of lemon cream and raspberry jam and all covered in white chocolate buttercream. Taste must not be waylaid for design…ever.
So as critical as I can be of my lack of originality, I am realizing that just because I can’t always come up with ideas on a whim doesn’t necessarily mean that I’m not an artist. I was listening to a Ted Talk by Steven Johnson the other day (author of Where Good Ideas Come From), and he discussed how very few creative ideas are entirely original. They are usually the result of a many inspirations and ideas coming together to create something new. He argued that this meshing of ideas was nothing to be ashamed of, but an essential part of the creative process.
I’m good with that. So maybe I’ll just go ahead and put myself in that artistic club after all. Who needs to compare themselves with other people anyway. I just made a delicious cake that looks like a freaking cigar box. And that’s pretty cool, if I do say so myself.
This post is dedicated to my dear friends, Ted and Bethany. Ted: thanks for letting me make a fuss about your birthday for once. And Bethany, thank you for your kind words and friendship, whether it be support during a crazy baking project or sharing the woes and joys of parenthood. You guys are simply the best.

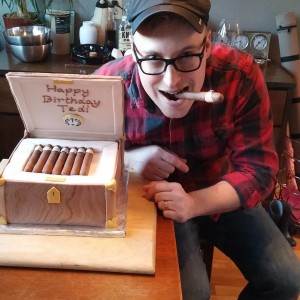
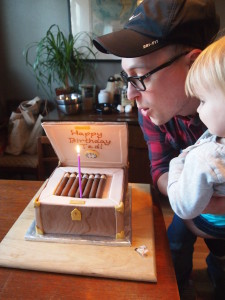

Awww…girl, you totally got this! 😉 It turned out so amazing. And Ted was positively beaming. (He was beaming the second day, too, when he took leftover slices into the office! In fact…I visited him at work a few weeks ago and the “lid” was still proudly displayed on his desk. That’s some durable fondant.)
You’re totally right about the creativity thing (at least, it’s true for me in my creativity) – it’s just a big amalgamation of inspirations with personalized twists here and there. Hold your head high and claim that title! 🙂
So glad he liked it! I have wanted to make him a cake since I started this hobby so it was fun to finally do it. Glad you get my creativity insecurities too…let’s be in the cool artists club together 😉
Girl, no artist works in a vacuum! Everyone looks to the world for inspiration. Compiling ideas and making connections is how artists work! But I totally get your feelings of inadequacy around that. I never really felt comfortable calling myself an Artist until I started saying I’m an artist with a lowercase “a”. I’m a maker and a doer and that totally involves scouring the internet (or books, or museums, or whatever) for ideas and combining them into your creation. Our good friend CS Lewis has something to say about this too:
“Even in literature and art [and cake decorating], no man who bothers about originality is ever original: whereas if you simply try to tell the truth (without caring twopence how often it has been told before) you will, nine times out of ten, become original without ever having noticed it.”
That is the most perfect quote about what I was getting at. Just leave it to Lewis to speak the truth! I love your creativity in all you touch, Mikah. You inspire me to keep trying new things 🙂
Aww… that’s why we’re kindred spirits!
trying to understand how you did the lid. Do you have a photo of the panels before you put fondant on them? What kind of foam board? Would cardboard work?
Sorry, I have been terrible about keeping up on my blog lately, so sorry for the delayed response! I don’t have photos of the lid before fondant, but it was two separate pieces of foamboard (I got mine at the dollar tree, but any kind would work…cardboard could work but it may not be as sturdy. The dampness in fondant/piping gel could make lose it’s structure). I glued them together at an angle- I believe the cake was 10×10, but you can really just make it any size that suits you.
What was the dimensions of the actual cake…was this a 10X10? or 12X12
Thanks – a customer wants this. Now I know how NOT to wing it… and how much to charge. I wasn’t aware of you before this, but will follow you now.
Thank you for your Amazing Cake tutorial. I am an amateur but Love challenging my artistic abilities to make cakes for friends n families. My husband’s birthday is coming up n I thought a cigar box cake but how … Like you can’t find tutorials just pictures. Thank you for sharing your instructions and your cigars are fabulous. You did an amazing job. I’m new to using fondant so this sorta is intimidating for me but I’m gonna give it a try. When frosting the cake with the buttercream, how thick was the buttercream? Thank you again for your inspiration n INSTRUCTIONS 🙂
With over 10 years in the cigar world at choixiga.vn, I truly admire how you combined passion and perseverance to create such a stunning Cigar Box Cake. It’s not just a beautiful piece—it captures the spirit of overcoming challenges with creativity. Congratulations on turning your idea into a wonderful experience!